细胞器组装 -- 二代数据 -- Getorganelle
一.下载安装
1.1 安装Miniconda
官网地址:https://docs.conda.io/en/latest/miniconda.html
wget -c https://repo.anaconda.com/miniconda/Miniconda3-latest-Linux-x86_64.sh

sh Miniconda3-latest-Linux-x86_64.sh
# 安装过程中点enter,选择yes

# 如果有需要请将conda环境加入自己的环境变量,否则直接运行conda不会有任何反应
# export PATH=$PATH:/home/miniconda3/bin
1) 出现选项时敲击“Enter”查看license agreement;
2)查看完license agreement后,需要输入“yes”表示接受才能继续;
3)需要确认安装路径,可以使用”Enter键”确认或更改安装目录;
4)经过1-2分钟安装完成后,需要同意安装器是否初始化miniconda,需要输入“yes”同意后,miniconda的“PATH”才能加入到~/.bashrc ;
5)source ~/.bashrc 配置到环境中方便调用。
在source之后可以使用命令 conda -V 查看Minconda3 的版本以用来检验是否安装并配置成功,也可以输入vim ~/.bashrc查看是否配置到环境中,配置成功则如下图

常用conda命令:
https://zhuanlan.zhihu.com/p/363904808
up主“凄凄惨惨戚戚”已经整理的很全面啦~
1.2 安装getorganelle
# 安装getorganelle
conda create -n getorganelle python=3.8 #创建名叫getorganelle的环境
conda install -n getorganelle -c bioconda getorganelle #安装getorangelle
conda activate getorganelle #激活环境
get_organelle_config.py --add embplant_pt,embplant_mt,other_pt,animal_mt #下载参考

# 注意到,其实可以本地 github 加速,20Mb+ 一下就下载完了
wget https://github.com/Kinggerm/GetOrganelleDB/releases/download/0.0.1/v0.0.1.tar.gz
# 本地下载 上传到服务器 也行,随便哪个目录
tar -zxvf v0.0.1.tar.gz # 在放压缩包的路径下解压
get_organelle_config.py -a embplant_pt,embplant_mt --use-local ./0.0.1
# 这里  默认配置好了 环境变量
# .bashrc里添加"export PATH=/share/nas1/yuj/software/miniconda3/envs/getorganelle/bin:$PATH"
get_organelle_config.py -a all --use-local ./0.0.1  # 安装所有基因组库
conda env list                                                        #列出环境
get_organelle_config.py --add embplant_pt       #配置高等植物质体基因组库
get_organelle_config.py --add embplant_mt      #配置高等植物线粒体基因组库
get_organelle_config.py --add other_pt              #配置其他植物质体基因组库
get_organelle_config.py --add fungus_mt           #配置真菌线粒体基因组库
get_organelle_config.py --add animal_mt           #配置动物线粒体基因组库
get_organelle_config.py --add embplant_nr       #配置高等植物核糖体DNA库
get_organelle_config.py --add fungus_nr            #配置真菌核糖体DNA库

基因组类型:embplant_pt(高等植物叶绿体), embplant_mt(高等植物线粒体)和 embplant_nr(高等植物核糖体 RNA), animal_mt (动物线粒体), fungus_mt (真菌线粒体)
二.使用
2.1 示例
#下载Demo
wget https://github.com/Kinggerm/GetOrganelleGallery/raw/master/Test/reads/Arabidopsis_simulated.1.fq.gz
wget https://github.com/Kinggerm/GetOrganelleGallery/raw/master/Test/reads/Arabidopsis_simulated.2.fq.gz

cd $你的工作目录

#植物的2G左右的数据,组装叶绿体基因组用命令
get_organelle_from_reads.py -1 forward.fq -2 reverse.fq -o plastome_output -R 15 -k 21,45,65,85,105 -F embplant_pt

#更快的方法
get_organelle_from_reads.py -1 forward.fq -2 reverse.fq -o plastome_output --fast -k 21,65,105 -w 0.68 -F embplant_pt

#组装植物线粒体基因组
get_organelle_from_reads.py -1 forward.fq -2 reverse.fq -o mitochondria_output -R 50 -k 21,45,65,85,105 -P 1000000 -F embplant_mt

#组装植物核核糖体DNA片段
get_organelle_from_reads.py -1 forward.fq -2 reverse.fq -o nr_output -R 10 -k 35,85,115 -F embplant_nr

#组装真菌线粒体
get_organelle_from_reads.py -1 forward.fq -2 reverse.fq -R 10 -k 21,45,65,85,105 -F fungus_mt -o fungus_mt_out  # if you fails with the default database, use your own seed database and label database with "-s" and "--genes"

#组装真菌的核糖体
get_organelle_from_reads.py -1 forward.fq -2 reverse.fq -R 10 -k 21,45,65,85,105 -F fungus_nr -o fungus_nr_out  # if you fails with the default database, use your own seed database and label database with "-s" and "--genes"

#组装动物线粒体
get_organelle_from_reads.py -1 forward.fq -2 reverse.fq -R 10 -k 21,45,65,85,105 -F animal_mt -o animal_mt_out   # if you fails with the default database, use your own seed database and label database with "-s" and "--genes"

##帮助命令
get_organelle_from_reads.py -h
-1 双端测序的R1
-2 双端测序的R2
-o 结果文件
-F 数据库
-s 参考序列
-t 线程数
-R 最大的一个扩充循环的数,一般默认15
-k kmer的一个参数


get_organelle_from_reads.py -1 sample_1.fastq.gz -2 sample_2.fastq.gz -F embplant_pt -w 0.6 -o output-plastome -R 10 -t 1 -k 21,45,65,85,105

-1
-2 正向和反向测序原始数据文件 (如果是单向测序, -u)
-F 设定要组装的基因组类型*
-o 结果输出保存的目录(文件夹)名称
-R 提取叶绿体基因 reads 的轮次(轮次越多,耗时越长)
-t 并行使用 CPU 的数量(多核可提速)
-k 调用SPAdes进行 denovo组装的k-mer,数值必须是奇数, 最大值是127
-w 提取叶绿体基因reads 时使用的长度比例或实际长度*

*word-size:提取叶绿体基因reads 时,可以使用reads 长度的比例(ratio),也可以设置实际长度的word-size。例如:如果使用ratio=0.6, 即 reads长度是150bp时,设置的word-size = 90bp,等同于设置 “-w 90”。
2.2 日常使用
#线粒体
/share/nas1/yuj/software/miniconda3/envs/getorganelle/bin/get_organelle_from_reads.py -1 *1.fq -2 *2.fq -o org -R 15 -k 21,45,65,85,105,115 -F animal_mt

#叶绿体
/share/nas1/yuj/software/miniconda3/envs/getorganelle/bin/get_organelle_from_reads.py -1 *1.fq -2 *2.fq -o org -R 15 -k 21,45,65,85,105,115 -F embplant_pt
2.3 其他命令
-------------------------------------------------------------assembly命令
#从现有的装配图中提取质体基因组(_.fastg/_.gfa;例如长读测序组件):
#常用推荐的命令(高等植物叶绿体基因组)

get_organelle_from_assembly.py -g assembly_graph.fastg -F embplant_pt -o output-plastome

-g SPAdes组装得到的FASTG的assembly graph
-F 设定要组装的基因组类型
-o 结果输出保存的目录(文件夹)名称

get_organelle_from_assembly.py -g assembly_graph.fastg -F embplant_pt -o output-plastome --min-depth 10  --max-depth 10000

-g SPAdes组装得到的FASTG的assembly graph
-F 设定要组装的基因组类型
-o 结果输出保存的目录(文件夹)名称
--min-depth 剔除graph中depth低于阈值的contigs
--max-depth 剔除graph中depth高于阈值的contigs
"--min-depth 10 "和"--max-depth10000"这两条命令是备选的,具体的depth需要可以自行设定。

-------------------------------------------------------------------graph.gfa命令
#准备工作
1.使用Bandage编辑保存为graph.gfa
2.gfa_to_fastg.py graph.gfa

get_organelle_from_assembly.py -g graph.gfa.fastg -F embplant_pt -o output-plastome --no-slim

-g Bandage梳理graph转换后的fastg
-F 设定要组装的基因组类群:embplant_pt(叶绿体),embplant_mt(线粒体)和embplant_nr(核糖体 RNA)
-o 结果输出保存的目录(文件夹)名称

PS:使用Bandage编辑后,可以“merge all possible nodes”,然后再输出的文件格式gfa图形文件,gfa文件可以用gfa_to_fastg.py做一下转换。虽然gfa也是图形文件,但是图形内容与fastg有差异些复杂图形会输出失败。
三.查看结果
在assembly_graph.fastg.extend_embplant_pt-embplant_mt.fastg与沿文件assembly_graph.fastg.extend_embplant_pt-embplant_mt.csv文件将通过进一步分析disentangle_organelle_assembly.py,和你的目标序列文件complete*path_sequence.fasta将作为产生的最终结果
PS:叶绿体基因组方向
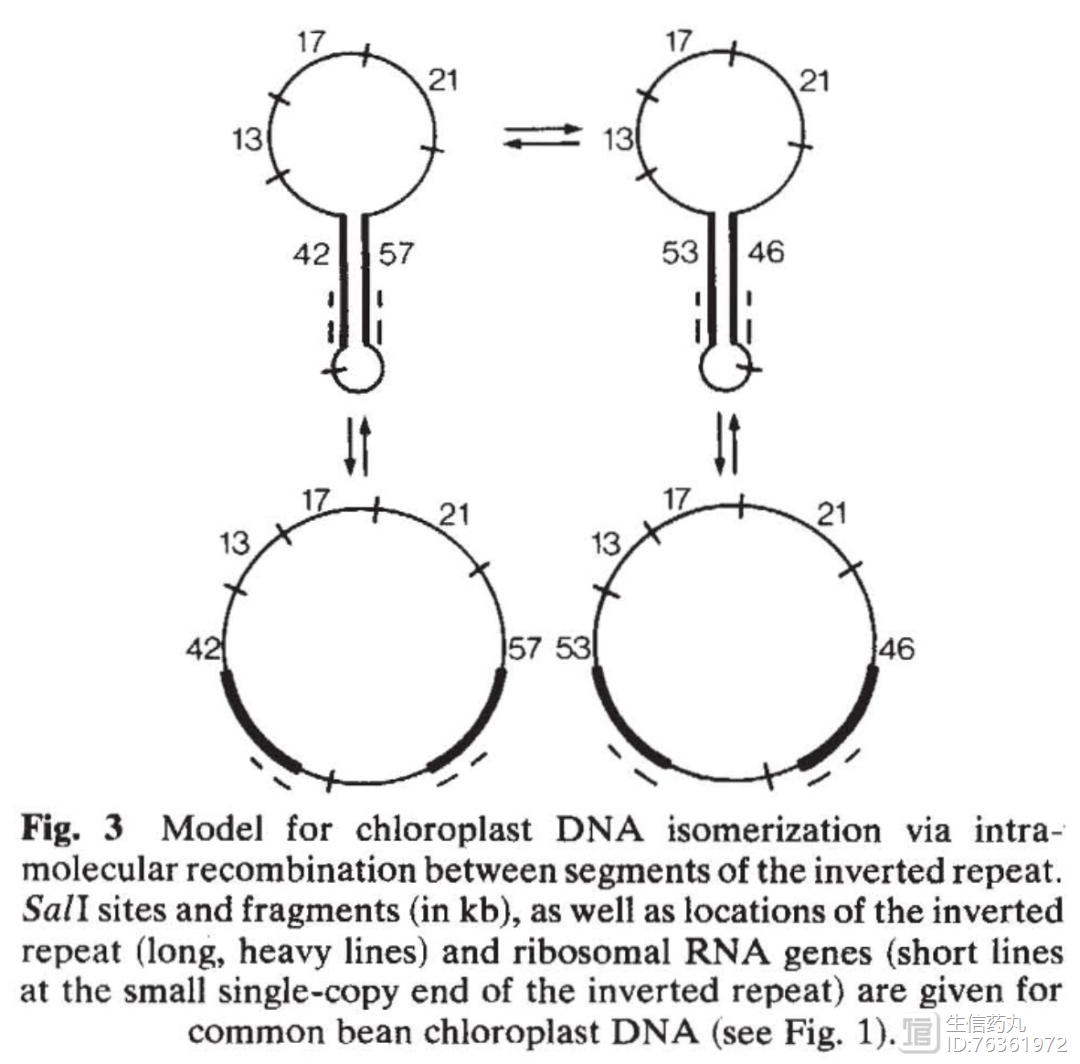
Palmer, J. Chloroplast DNA exists in two orientations. Nature 301, 92–93 (1983). https://doi.org/10.1038/301092a0
Palmer, J. Chloroplast DNA exists in two orientations. Nature 301, 92–93 (1983). https://doi.org/10.1038/301092a0